> ## Documentation Index
> Fetch the complete documentation index at: https://portkey-docs-feat-rerank-documentation.mintlify.site/llms.txt
> Use this file to discover all available pages before exploring further.
# Adding Custom Models
> Learn how to add custom and fine-tuned models to your Portkey Model Catalog for seamless integration.
Portkey's Model Catalog is designed to be a central hub for all the models you use, providing a unified interface for both supported and private models. By adding your custom or fine-tuned models to the catalog, you can seamlessly integrate them into your applications, leverage Portkey's unified API signature, and benefit from centralized logging, monitoring, and management.
This is especially useful for:
* **Fine-tuned Models**: Integrating your fine-tuned versions of popular models (e.g., `ft:gpt-4.1-nano`).
* **Internal/Proprietary Models**: Using your own in-house models through the Portkey gateway.
* **Models Not Natively Supported**: Adding models from providers that Portkey doesn't yet have a direct integration with, while mapping them to a compatible API signature.
## Adding a New Custom Model
You can add a custom model directly from your Portkey dashboard.
 1. Navigate to the relevant [**Integration**](https://app.portkey.ai/integrations) in your Portkey account, select the Integration for which you want to add a custom model.
2. Select the **Model Provisioning** step from steps.
3. Click the **Add Model** button on the top-right corner of the page.
This will open the **Add Custom Model** form.
1. Navigate to the relevant [**Integration**](https://app.portkey.ai/integrations) in your Portkey account, select the Integration for which you want to add a custom model.
2. Select the **Model Provisioning** step from steps.
3. Click the **Add Model** button on the top-right corner of the page.
This will open the **Add Custom Model** form.
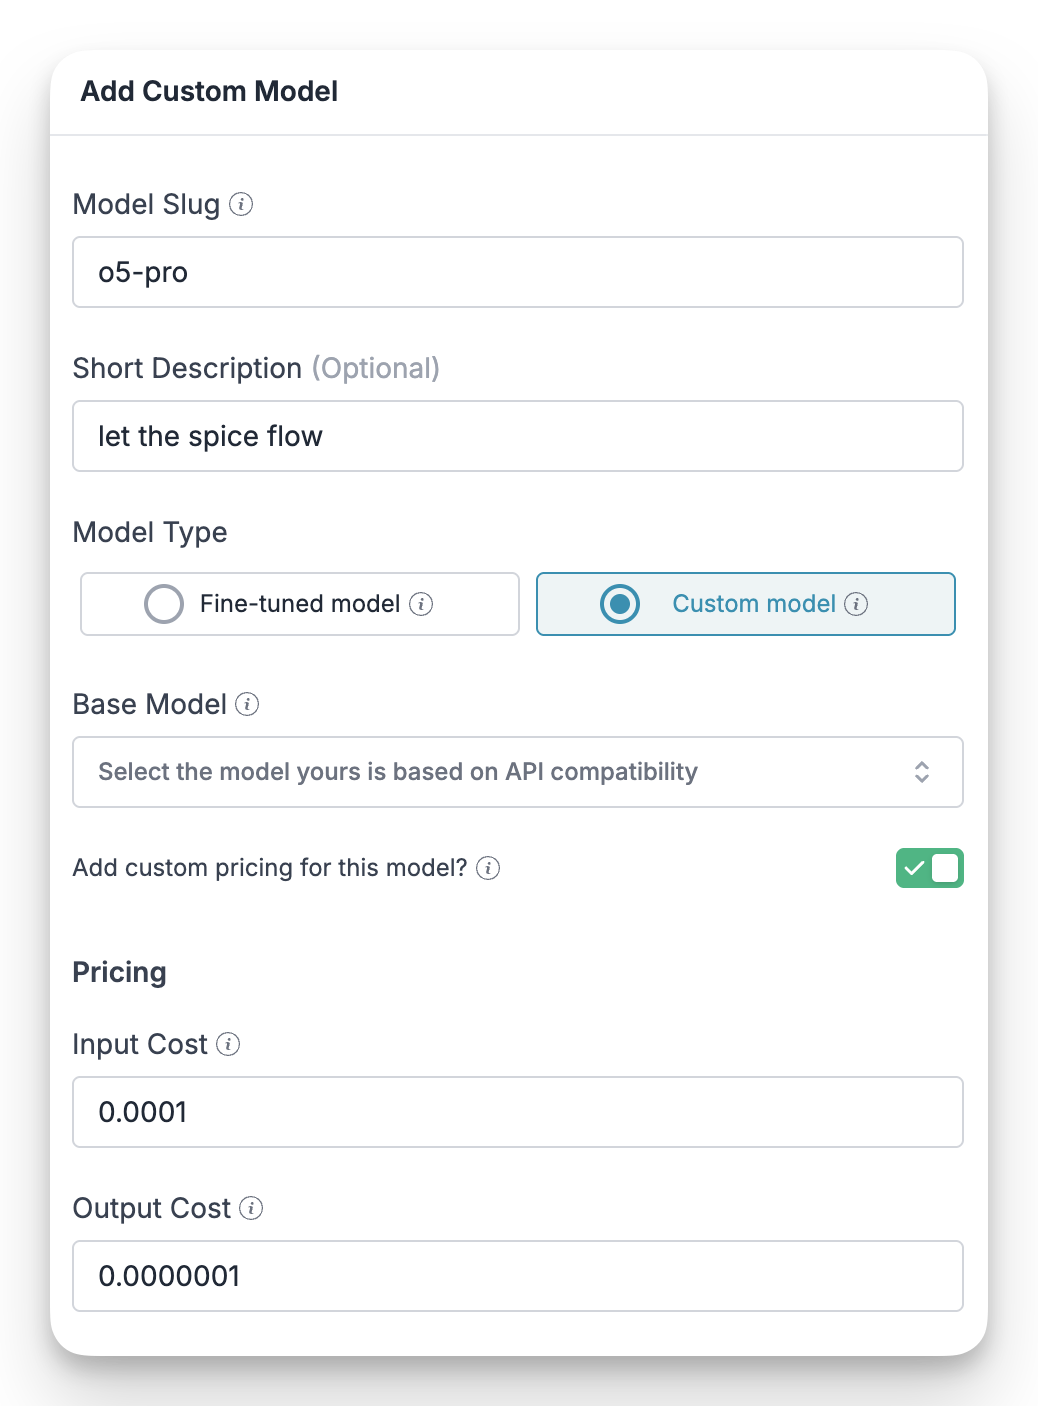 ### Configuration Fields
Here’s a breakdown of each field in the form:
A unique, lowercase identifier for your model (e.g., `my-custom-model-v1`). This slug is what you will use in your API requests to reference this model.
An optional, brief description to help you and your team understand the model's purpose or version.
Specify the nature of your model:
* **Fine-tuned model**: Select this if you are adding a fine-tuned version of a base model (like `ft:gpt-3.5-turbo`).
* **Custom model**: Select this for any other model, such as proprietary in-house models.
Select an existing model that your custom model is based on in terms of **API compatibility**. For example, if your custom model accepts the same request payload and returns the same response structure as `gpt-4`, you would select `gpt-4` here. This ensures Portkey can correctly format requests and parse responses.
Enable this toggle if you want to associate specific input and output costs with your model. This is useful for accurate cost tracking and budget management within Portkey's dashboard.
## Using Your Custom Model
Once you've added your custom model, you can use it just like any other model in the catalog. Simply reference its **Model Slug** in your API calls.
For example, to use a custom model with the slug `my-custom-model-v1` in a chat completion request, you would set it as the `model` in your provider configuration or pass it directly in the request header:
```bash theme={"system"}
curl -X POST https://api.portkey.ai/v1/chat/completions \
-H "Content-Type: application/json" \
-H "x-portkey-api-key: YOUR_PORTKEY_API_KEY" \
-d '{
"model": "@provider/my-custom-model-v1",
"messages": [
{
"role": "user",
"content": "Hello, what can you do?"
}
]
}'
```
```python theme={"system"}
from portkey_ai import Portkey
client = Portkey(
api_key="YOUR_PORTKEY_API_KEY"
)
response = client.chat.completions.create(
model="@provider/my-custom-model-v1",
messages=[
{
"role": "user",
"content": "Hello, what can you do?"
}
]
)
print(response.choices[0].message.content)
```
Portkey will route the request to the provider associated with the base model you selected, using your custom model's slug.
### Configuration Fields
Here’s a breakdown of each field in the form:
A unique, lowercase identifier for your model (e.g., `my-custom-model-v1`). This slug is what you will use in your API requests to reference this model.
An optional, brief description to help you and your team understand the model's purpose or version.
Specify the nature of your model:
* **Fine-tuned model**: Select this if you are adding a fine-tuned version of a base model (like `ft:gpt-3.5-turbo`).
* **Custom model**: Select this for any other model, such as proprietary in-house models.
Select an existing model that your custom model is based on in terms of **API compatibility**. For example, if your custom model accepts the same request payload and returns the same response structure as `gpt-4`, you would select `gpt-4` here. This ensures Portkey can correctly format requests and parse responses.
Enable this toggle if you want to associate specific input and output costs with your model. This is useful for accurate cost tracking and budget management within Portkey's dashboard.
## Using Your Custom Model
Once you've added your custom model, you can use it just like any other model in the catalog. Simply reference its **Model Slug** in your API calls.
For example, to use a custom model with the slug `my-custom-model-v1` in a chat completion request, you would set it as the `model` in your provider configuration or pass it directly in the request header:
```bash theme={"system"}
curl -X POST https://api.portkey.ai/v1/chat/completions \
-H "Content-Type: application/json" \
-H "x-portkey-api-key: YOUR_PORTKEY_API_KEY" \
-d '{
"model": "@provider/my-custom-model-v1",
"messages": [
{
"role": "user",
"content": "Hello, what can you do?"
}
]
}'
```
```python theme={"system"}
from portkey_ai import Portkey
client = Portkey(
api_key="YOUR_PORTKEY_API_KEY"
)
response = client.chat.completions.create(
model="@provider/my-custom-model-v1",
messages=[
{
"role": "user",
"content": "Hello, what can you do?"
}
]
)
print(response.choices[0].message.content)
```
Portkey will route the request to the provider associated with the base model you selected, using your custom model's slug.