> ## Documentation Index
> Fetch the complete documentation index at: https://portkey-docs-feat-rerank-documentation.mintlify.site/llms.txt
> Use this file to discover all available pages before exploring further.
# Upstage AI
> Integrate Upstage with Portkey AI for seamless completions, prompt management, and advanced features like streaming and embedding.
**Portkey Provider Slug:** `upstage`
## Overview
Portkey offers native integrations with [Upstage](https://www.upstage.ai/) for Node.js, Python, and REST APIs. By combining Portkey with Upstage, you can create production-grade AI applications with enhanced reliability, observability, and advanced features.
Explore the official Upstage documentation for comprehensive details on their APIs and models.
## Getting Started
Visit the [Upstage dashboard](https://console.upstage.ai/api-keys) to generate your API key.
Portkey's virtual key vault simplifies your interaction with Upstage. Virtual keys act as secure aliases for your actual API keys, offering enhanced security and easier management through [budget limits](/product/ai-gateway/virtual-keys/budget-limits) to control your API usage.
Use the Portkey app to create a [virtual key](/product/ai-gateway/virtual-keys) associated with your Upstage API key.
Now that you have your virtual key, set up the Portkey client:
### Portkey Hosted App
Use the Portkey API key and the Upstage virtual key to initialize the client in your preferred programming language.
```python Python theme={"system"}
from portkey_ai import Portkey
portkey = Portkey(
api_key="PORTKEY_API_KEY", # Replace with your Portkey API key
virtual_key="VIRTUAL_KEY" # Replace with your virtual key for Upstage
)
```
```javascript Node.js theme={"system"}
import Portkey from 'portkey-ai'
const portkey = new Portkey({
apiKey: "PORTKEY_API_KEY", // defaults to process.env["PORTKEY_API_KEY"]
virtualKey: "VIRTUAL_KEY" // Your Upstage Virtual Key
})
```
### Open Source Use
Alternatively, use Portkey's Open Source AI Gateway to enhance your app's reliability with minimal code:
```python Python theme={"system"}
from portkey_ai import Portkey, PORTKEY_GATEWAY_URL
portkey = Portkey(
api_key="dummy", # Replace with your Portkey API key
base_url=PORTKEY_GATEWAY_URL,
Authorization="UPSTAGE_API_KEY", # Replace with your Upstage API Key
provider="upstage"
)
```
```javascript Node.js theme={"system"}
import Portkey, { PORTKEY_GATEWAY_URL } from 'portkey-ai'
const portkey = new Portkey({
apiKey: "dummy", // Replace with your Portkey API key
baseUrl: PORTKEY_GATEWAY_URL,
Authorization: "UPSTAGE_API_KEY", // Replace with your Upstage API Key
provider: "upstage"
})
```
🔥 That's it! You've integrated Portkey into your application with just a few lines of code. Now let's explore making requests using the Portkey client.
## Supported Models
`Chat` - solar-pro, solar-mini and solar-mini-ja
`Embedding`- embedding-passage, embedding-query
## Supported Endpoints and Parameters
| Endpoint | Supported Parameters |
| -------------- | ----------------------------------------------------------------------------------------- |
| `chatComplete` | messages, max\_tokens, temperature, top\_p, stream, presence\_penalty, frequency\_penalty |
| `embed` | model, input, encoding\_format, dimensions, user |
## Upstage Supported Features
### Chat Completions
Generate chat completions using Upstage models through Portkey:
```python Python theme={"system"}
completion = portkey.chat.completions.create(
messages=[{"role": "user", "content": "Say this is a test"}],
model="solar-pro"
)
print(completion.choices[0].message.content)
```
```javascript Node.js theme={"system"}
const chatCompletion = await portkey.chat.completions.create({
messages: [{ role: 'user', content: 'Say this is a test' }],
model: 'solar-pro',
});
console.log(chatCompletion.choices[0].message.content);
```
```curl REST theme={"system"}
curl -X POST "https://api.portkey.ai/v1/chat/completions" \
-H "Content-Type: application/json" \
-H "Authorization: Bearer YOUR_PORTKEY_API_KEY" \
-d '{
"messages": [{"role": "user", "content": "Say this is a test"}],
"model": "solar-pro"
}'
```
### Streaming
Stream responses for real-time output in your applications:
```python Python theme={"system"}
chat_complete = portkey.chat.completions.create(
model="solar-pro",
messages=[{"role": "user", "content": "Say this is a test"}],
stream=True
)
for chunk in chat_complete:
print(chunk.choices[0].delta.content or "", end="", flush=True)
```
```javascript Node.js theme={"system"}
const stream = await portkey.chat.completions.create({
model: 'gpt-4',
messages: [{ role: 'user', content: 'Say this is a test' }],
stream: true,
});
for await (const chunk of stream) {
process.stdout.write(chunk.choices[0]?.delta?.content || '');
}
```
```curl REST theme={"system"}
curl -X POST "https://api.portkey.ai/v1/chat/completions" \
-H "Content-Type: application/json" \
-H "Authorization: Bearer YOUR_PORTKEY_API_KEY" \
-d '{
"model": "solar-pro",
"messages": [{"role": "user", "content": "Say this is a test"}],
"stream": true
}'
```
### Function Calling
Leverage Upstage's function calling capabilities through Portkey:
```javascript Node.js theme={"system"}
let tools = [{
type: "function",
function: {
name: "getWeather",
description: "Get the current weather",
parameters: {
type: "object",
properties: {
location: { type: "string", description: "City and state" },
unit: { type: "string", enum: ["celsius", "fahrenheit"] }
},
required: ["location"]
}
}
}];
let response = await portkey.chat.completions.create({
model: "solar-pro",
messages: [
{ role: "system", content: "You are a helpful assistant." },
{ role: "user", content: "What's the weather like in Delhi - respond in JSON" }
],
tools,
tool_choice: "auto",
});
console.log(response.choices[0].finish_reason);
```
```python Python theme={"system"}
tools = [{
"type": "function",
"function": {
"name": "getWeather",
"description": "Get the current weather",
"parameters": {
"type": "object",
"properties": {
"location": {"type": "string", "description": "City and state"},
"unit": {"type": "string", "enum": ["celsius", "fahrenheit"]}
},
"required": ["location"]
}
}
}]
response = portkey.chat.completions.create(
model="solar-pro",
messages=[
{"role": "system", "content": "You are a helpful assistant."},
{"role": "user", "content": "What's the weather like in Delhi - respond in JSON"}
],
tools=tools,
tool_choice="auto"
)
print(response.choices[0].finish_reason)
```
```curl REST theme={"system"}
curl -X POST "https://api.portkey.ai/v1/chat/completions" \
-H "Content-Type: application/json" \
-H "Authorization: Bearer YOUR_PORTKEY_API_KEY" \
-d '{
"model": "solar-pro",
"messages": [
{"role": "system", "content": "You are a helpful assistant."},
{"role": "user", "content": "What'\''s the weather like in Delhi - respond in JSON"}
],
"tools": [{
"type": "function",
"function": {
"name": "getWeather",
"description": "Get the current weather",
"parameters": {
"type": "object",
"properties": {
"location": {"type": "string", "description": "City and state"},
"unit": {"type": "string", "enum": ["celsius", "fahrenheit"]}
},
"required": ["location"]
}
}
}],
"tool_choice": "auto"
}'
```
### Embeddings
Generate embeddings for text using Upstage embedding models:
```python Python theme={"system"}
response = portkey.embeddings.create(
input="Your text string goes here",
model="embedding-query"
)
print(response.data[0].embedding)
```
```javascript Node.js theme={"system"}
const response = await portkey.embeddings.create({
input: "Your text string goes here",
model: "embedding-query"
});
console.log(response.data[0].embedding);
```
```curl REST theme={"system"}
curl -X POST "https://api.portkey.ai/v1/embeddings" \
-H "Content-Type: application/json" \
-H "Authorization: Bearer YOUR_PORTKEY_API_KEY" \
-d '{
"input": "Your text string goes here",
"model": "embedding-query"
}'
```
# Portkey's Advanced Features
## Track End-User IDs
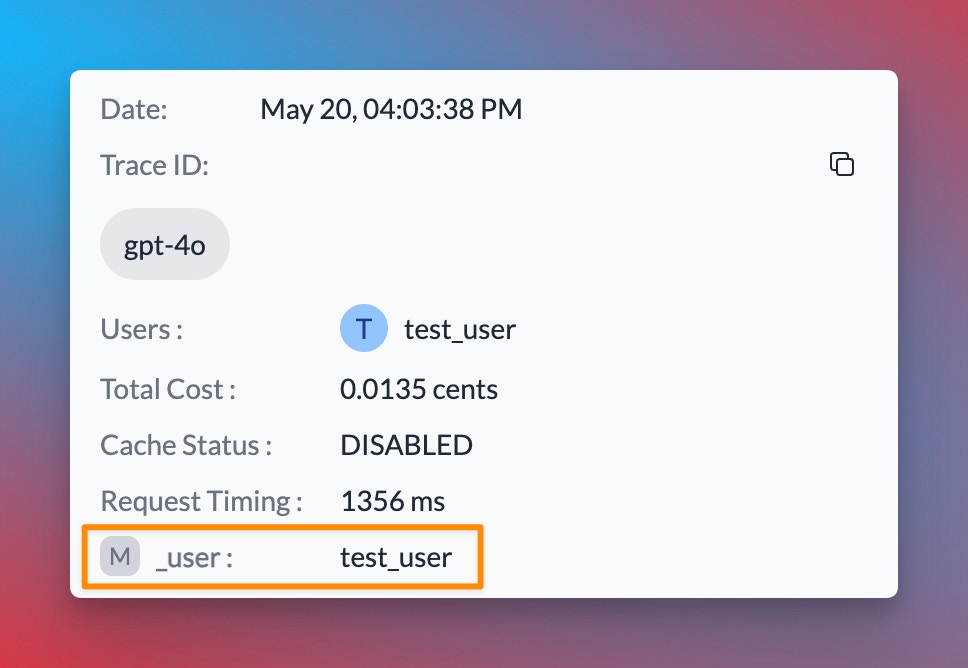
Portkey allows you to track user IDs passed with the user parameter in Upstage requests, enabling you to monitor user-level costs, requests, and more:
```python Python theme={"system"}
response = portkey.chat.completions.create(
model="solar-pro",
messages=[{"role": "user", "content": "Say this is a test"}],
user="user_123456"
)
```
```javascript Node.js theme={"system"}
const chatCompletion = await portkey.chat.completions.create({
messages: [{ role: "user", content: "Say this is a test" }],
model: "solar-pro",
user: "user_12345",
});
```
```curl REST theme={"system"}
curl -X POST "https://api.portkey.ai/v1/chat/completions" \
-H "Content-Type: application/json" \
-H "Authorization: Bearer YOUR_PORTKEY_API_KEY" \
-d '{
"model": "solar-pro",
"messages": [{"role": "user", "content": "Say this is a test"}],
"user": "user_123456"
}'
```
When you include the user parameter in your requests, Portkey logs will display the associated user ID, as shown in the image below:
 In addition to the `user` parameter, Portkey allows you to send arbitrary custom metadata with your requests. This powerful feature enables you to associate additional context or information with each request, which can be useful for analysis, debugging, or other custom use cases.
Explore how to use custom metadata to enhance your request tracking and analysis.
## Using The Gateway Config
Here's a simplified version of how to use Portkey's Gateway Configuration:
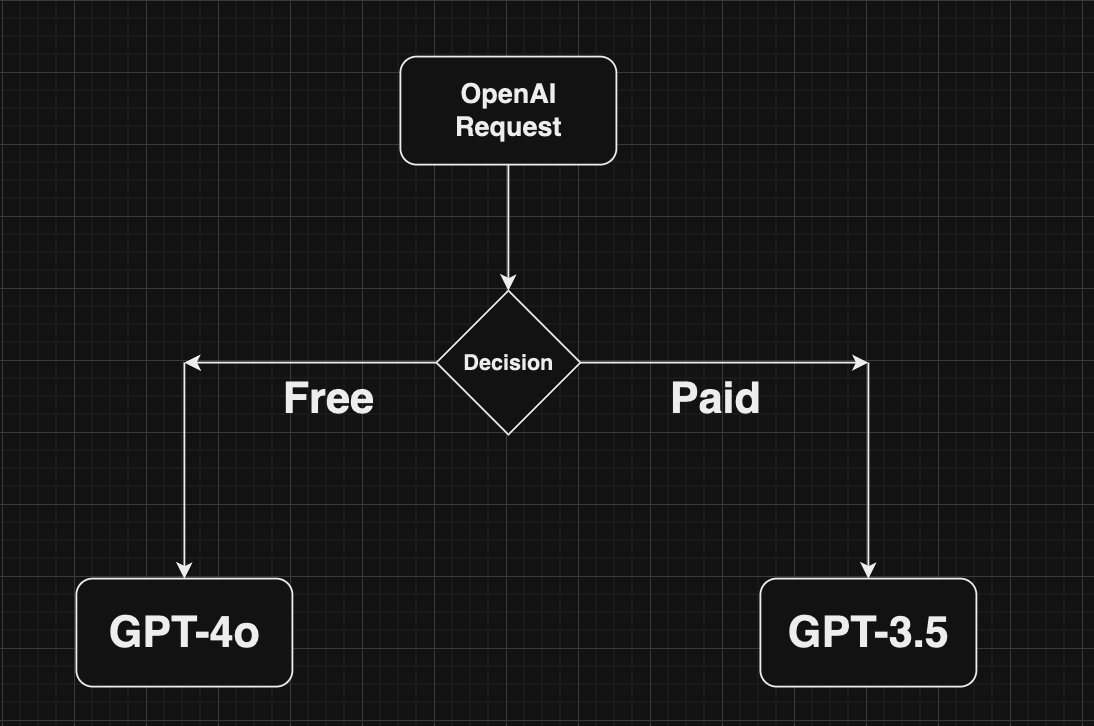
You can create a Gateway configuration using the Portkey Config Dashboard or by writing a JSON configuration in your code. In this example, requests are routed based on the user's subscription plan (paid or free).
```json theme={"system"}
config = {
"strategy": {
"mode": "conditional",
"conditions": [
{
"query": { "metadata.user_plan": { "$eq": "paid" } },
"then": "solar-pro"
},
{
"query": { "metadata.user_plan": { "$eq": "free" } },
"then": "gpt-3.5"
}
],
"default": "base-gpt4"
},
"targets": [
{
"name": "solar-pro",
"virtual_key": "xx"
},
{
"name": "gpt-3.5",
"virtual_key": "yy"
}
]
}
```
When a user makes a request, it will pass through Portkey's AI Gateway. Based on the configuration, the Gateway routes the request according to the user's metadata.
In addition to the `user` parameter, Portkey allows you to send arbitrary custom metadata with your requests. This powerful feature enables you to associate additional context or information with each request, which can be useful for analysis, debugging, or other custom use cases.
Explore how to use custom metadata to enhance your request tracking and analysis.
## Using The Gateway Config
Here's a simplified version of how to use Portkey's Gateway Configuration:
You can create a Gateway configuration using the Portkey Config Dashboard or by writing a JSON configuration in your code. In this example, requests are routed based on the user's subscription plan (paid or free).
```json theme={"system"}
config = {
"strategy": {
"mode": "conditional",
"conditions": [
{
"query": { "metadata.user_plan": { "$eq": "paid" } },
"then": "solar-pro"
},
{
"query": { "metadata.user_plan": { "$eq": "free" } },
"then": "gpt-3.5"
}
],
"default": "base-gpt4"
},
"targets": [
{
"name": "solar-pro",
"virtual_key": "xx"
},
{
"name": "gpt-3.5",
"virtual_key": "yy"
}
]
}
```
When a user makes a request, it will pass through Portkey's AI Gateway. Based on the configuration, the Gateway routes the request according to the user's metadata.
 Pass the Gateway configuration to your Portkey client. You can either use the config object or the Config ID from Portkey's hosted version.
```python Python theme={"system"}
from portkey_ai import Portkey
portkey = Portkey(
api_key="PORTKEY_API_KEY",
virtual_key="VIRTUAL_KEY",
config=portkey_config
)
```
```javascript Node.js theme={"system"}
import Portkey from 'portkey-ai'
const portkey = new Portkey({
apiKey: "PORTKEY_API_KEY",
virtualKey: "VIRTUAL_KEY",
config: portkeyConfig
})
```
That's it! Portkey seamlessly allows you to make your AI app more robust using built-in gateway features. Learn more about advanced gateway features:
Distribute requests across multiple targets based on defined weights.
Automatically switch to backup targets if the primary target fails.
Route requests to different targets based on specified conditions.
Enable caching of responses to improve performance and reduce costs.
## Guardrails
Portkey's AI gateway enables you to enforce input/output checks on requests by applying custom hooks before and after processing. Protect your user's/company's data by using PII guardrails and many more available on Portkey Guardrails:
```json theme={"system"}
{
"virtual_key":"upstage-xxx",
"before_request_hooks": [{
"id": "input-guardrail-id-xx"
}],
"after_request_hooks": [{
"id": "output-guardrail-id-xx"
}]
}
```
Explore Portkey's guardrail features to enhance the security and reliability of your AI applications.
## Next Steps
The complete list of features supported in the SDK are available in our comprehensive documentation:
Explore the full capabilities of the Portkey SDK and how to leverage them in your projects.
***
## Limitations
Portkey does not support the following Upstage features:
* Document Parse
* Document QA
* Document OCR
* Embeddings
* Translation
* Groundedness Check
* Key Information Extraction
For the most up-to-date information on supported features and endpoints, please refer to our [API Reference](/docs/api-reference/introduction).
Pass the Gateway configuration to your Portkey client. You can either use the config object or the Config ID from Portkey's hosted version.
```python Python theme={"system"}
from portkey_ai import Portkey
portkey = Portkey(
api_key="PORTKEY_API_KEY",
virtual_key="VIRTUAL_KEY",
config=portkey_config
)
```
```javascript Node.js theme={"system"}
import Portkey from 'portkey-ai'
const portkey = new Portkey({
apiKey: "PORTKEY_API_KEY",
virtualKey: "VIRTUAL_KEY",
config: portkeyConfig
})
```
That's it! Portkey seamlessly allows you to make your AI app more robust using built-in gateway features. Learn more about advanced gateway features:
Distribute requests across multiple targets based on defined weights.
Automatically switch to backup targets if the primary target fails.
Route requests to different targets based on specified conditions.
Enable caching of responses to improve performance and reduce costs.
## Guardrails
Portkey's AI gateway enables you to enforce input/output checks on requests by applying custom hooks before and after processing. Protect your user's/company's data by using PII guardrails and many more available on Portkey Guardrails:
```json theme={"system"}
{
"virtual_key":"upstage-xxx",
"before_request_hooks": [{
"id": "input-guardrail-id-xx"
}],
"after_request_hooks": [{
"id": "output-guardrail-id-xx"
}]
}
```
Explore Portkey's guardrail features to enhance the security and reliability of your AI applications.
## Next Steps
The complete list of features supported in the SDK are available in our comprehensive documentation:
Explore the full capabilities of the Portkey SDK and how to leverage them in your projects.
***
## Limitations
Portkey does not support the following Upstage features:
* Document Parse
* Document QA
* Document OCR
* Embeddings
* Translation
* Groundedness Check
* Key Information Extraction
For the most up-to-date information on supported features and endpoints, please refer to our [API Reference](/docs/api-reference/introduction).